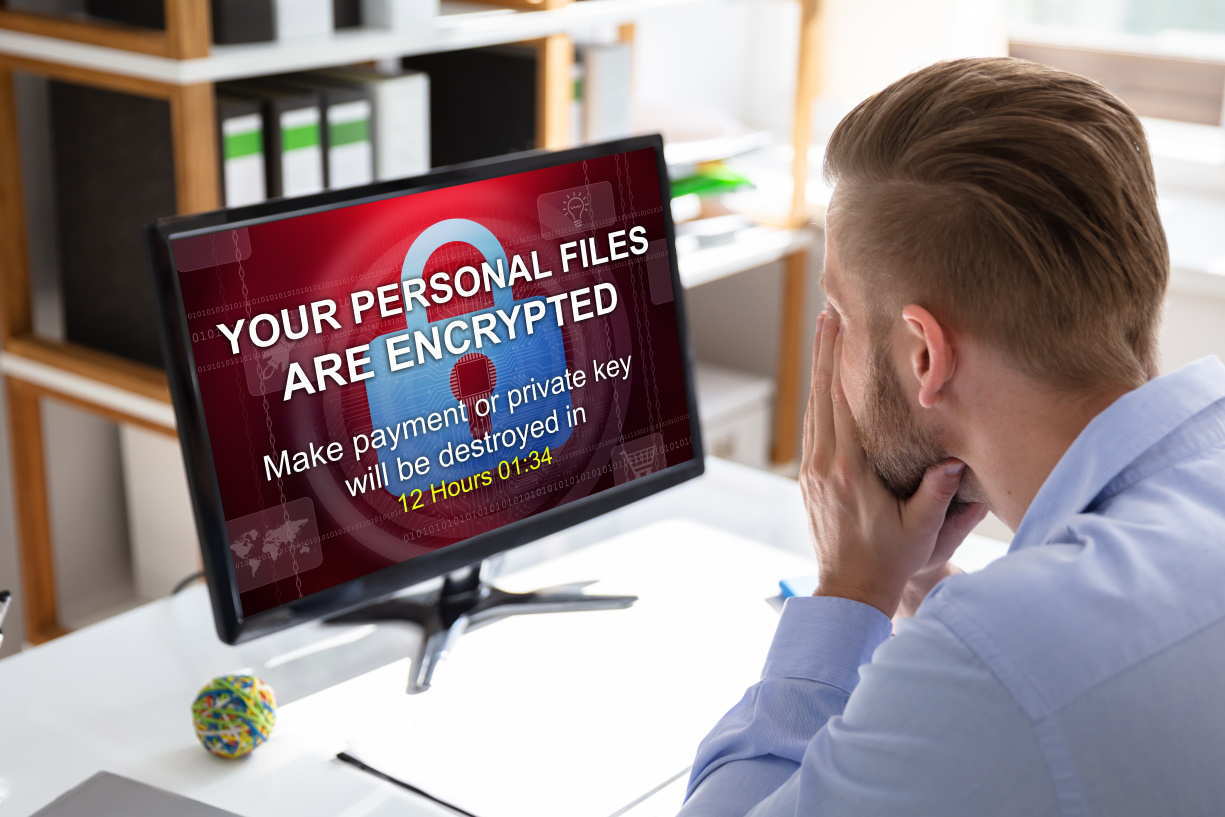
Microsoft’s PowerShell is a powerful scripting application which is built natively into Windows 10 devices. While this application allows great power for administrators to configure and control their devices it also opens up huge opportunities for hackers to launch malware attacks including the recent spike of ransomware attacks in which the universal element in common was the use of PowerShell. This article describes how a Microsoft 365 Endpoint administrator can selective disable PowerShell either on a device by device basis or for a group of devices registered through the Microsoft 365 Azure Active Directory. These instructions were created for Windows 10 devices registered through the BYOD registration method but should also work for the other enrollment methods albeit with slight differences. These would also work within a hybrid environment with small adjustments. For the latter, just follow these instructions but when you roll out the configuration profile in Microsoft Endpoint Manager but make adjustments by following the config profile creation for Intune per this article: https://www.petervanderwoude.nl/post/managing-applocker-on-windows-10-via-oma-dm/
Note: I am thankful for the very helpful instructions provided by Peter van der Woude in the article referenced above. I also wish to thank Alex Fields from ITProMentor who sent me Peter’s article as well as for his very helpful articles on Microsoft 365. I highly recommend reading them at his site at: https://www.itpromentor.com/
Summary of Steps to Disable PowerShell in a Microsoft 365 Cloud Only Environment through the Microsoft Endpoint Manager:
Note: Thanks to a comment from James B we have revised this procedure to utilize the file hash method instead of the file path method. That is now reflected below as of September 22, 2021. This policy will now block the execution of the four files, however if the files are updated the policy will need to reflect the new hash values.
- Create New Security Group. In Endpoint Manager, create a security group which you will use to assign users and devices for which you want to disable PowerShell. I recommend that you add just one test device to this new security group at first for testing purposes before you roll it out to your entire enterprise. You could name your security group something like “Disable Powershell for Users and Devices.”
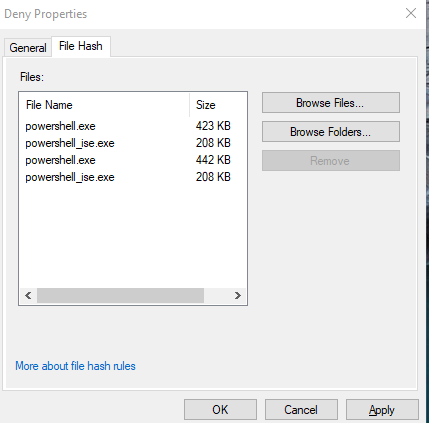
- Create XML Device Policy. Using a Windows 10 computer, use the Group Policy Editor to create a Applocker device policy which blocks the use of the EXE files associated with PowerShell. Use the file hash method and for these two four files found in these locations:
C:\Windows\System32\WindowsPowerShell\v1.0\powershell.exe
C:\Windows\System32\WindowsPowerShell\v1.0\powershell_ise.exe
C:\Windows\SysWOW64\WindowsPowerShell\v1.0\powershell.exe
C:\Windows\SysWOW64\WindowsPowerShell\v1.0\powershell_ise.exe
Important: You will need to edit the XML created in the Group Policy Manager and delete just the elements you need. - Apply the Device Profile. Finally, roll out the device configuration profile in the Microsoft Endpoint Manager using the following OMI-URI:
./Vendor/MSFT/AppLocker/ApplicationLaunchRestrictions/9000/EXE/Policy where the string value of “9000” is some value that you decide upon that makes sense to you. The other values must be entered exactly and this string is case sensitive. I use policy strings with 9’s in them when they contain restrictions, use what makes sense to you.
Detailed Steps of how to Disable PowerShell in a Microsoft 365 Cloud Only Environment through the Microsoft Endpoint Manager:
Step 1 – Create new Security Group in Endpoint Manager
Build the Security Group you will use to restrict devices and users from using PowerShell. If users never require the use of PowerShell, and they already have local administrative access, then why allow them to have access to this powerful program in the first place? Open the Endpoint Manager and browse to Groups from the home menu tree. Create a new security group and name it with something that makes sense like “Disable PowerShell for Users and Devices.” Add one test device to the new security group. Later, when you want to quickly enforce the policy on this device, you will open that Windows 10 computer, select the Company Portal app (you do have this installed for every device per the BYOD device enrollment process, right?) and under the settings gear select “Sync.” This will sync the policies in the Endpoint Manager to the local Windows 10 device.
Step 2 – Create the Device Policy in the Group Policy Editor
Open the local group policy editor on a Windows 10 computer by typing “edit group policy” at the start menu. When the policy editor opens browse to this tree. It is helpful to follow the more detailed instructions provided by Kenneth Van Surksun in this very helpful article. Note that even though you will need to create the default policies in that tree you will later edit the XML file and remove everything that is not relevant to the new policy restricting the use of PowerShell. Microsoft has also provided an excellent technical article detailing the Applocker CSP which provides the information necessary to specify the correct OMI-URI settings for the restriction of the EXE part of the tree. Note: This is a fairly hard element to figure out without help from others. It took me a long while to determine the correct values so hopefully this article was of help to you!
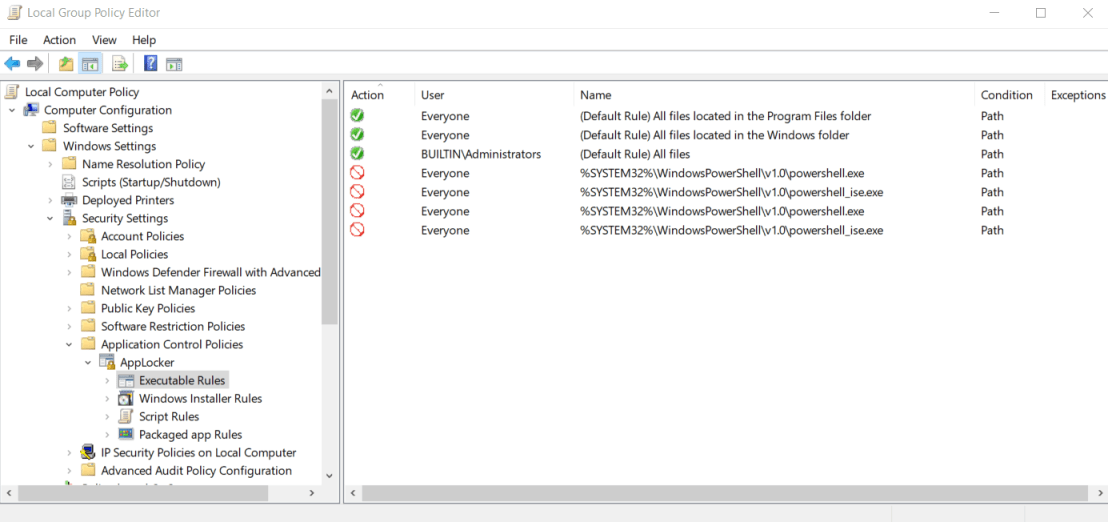
Figure One: Tree Diagram from the Group Policy Editor
Notice that I have already defined both the default policies as well as the restrictions for the EXE files associated with PowerShell. You will need to include policy restrictions for these EXE files:
C:\Windows\System32\WindowsPowerShell\v1.0\powershell.exe
C:\Windows\System32\WindowsPowerShell\v1.0\powershell_ise.exe
And, for 64-bit Machines:
C:\Windows\SysWOW64\WindowsPowerShell\v1.0\powershell.exe
C:\Windows\SysWOW64\WindowsPowerShell\v1.0\powershell_ise.exe
The following is one of these deny policies:


Create each of the four policies, then right click on the AppLocker tree and select Export. This will export an XML file for the new policy. Then, edit the XML file by removing everything except the single policy you have defined for the new restriction.
Your final XML file should look something like mine:
<RuleCollection Type=”Exe” EnforcementMode=”Enabled”>
<FilePathRule Id=”921cc481-6e17-4653-8f75-050b80acca20″ Name=”(Default Rule) All files located in the Program Files folder” Description=”Allows members of the Everyone group to run applications that are located in the Program Files folder.” UserOrGroupSid=”S-1-1-0″ Action=”Allow”>
<Conditions>
<FilePathCondition Path=”%PROGRAMFILES%\*” />
</Conditions>
</FilePathRule>
<FilePathRule Id=”a61c8b2c-a319-4cd0-9690-d2177cad7b51″ Name=”(Default Rule) All files located in the Windows folder” Description=”Allows members of the Everyone group to run applications that are located in the Windows folder.” UserOrGroupSid=”S-1-1-0″ Action=”Allow”>
<Conditions>
<FilePathCondition Path=”%WINDIR%\*” />
</Conditions>
</FilePathRule>
<FilePathRule Id=”fd686d83-a829-4351-8ff4-27c7de5755d2″ Name=”(Default Rule) All files” Description=”Allows members of the local Administrators group to run all applications.” UserOrGroupSid=”S-1-5-32-544″ Action=”Allow”>
<Conditions>
<FilePathCondition Path=”*” />
</Conditions>
</FilePathRule>
<FileHashRule Id=”df42b48b-0bd5-444a-893a-98eb3bac349b” Name=”Via Hash powershell.exe powershell_ise.exe” Description=”Block via hash Via Hash powershell.exe powershell_ise.exe” UserOrGroupSid=”S-1-1-0″ Action=”Deny”>
<Conditions>
<FileHashCondition>
<FileHash Type=”SHA256″ Data=”0xB6F3EF35A570861DEDD3ED9BFAD1910B537AE38C701B4AB19C5966A05E61689E” SourceFileName=”powershell.exe” SourceFileLength=”433152″ />
<FileHash Type=”SHA256″ Data=”0x45C77CCBCE87AD3A7B87755E83E8947C7FF08701C239076BCC0336198EB790C8″ SourceFileName=”powershell_ise.exe” SourceFileLength=”213504″ />
<FileHash Type=”SHA256″ Data=”0xBAC613D793971F156BA846F8B1C1ABF6A635309EA32BD9258CD2AA1E1CD8C51E” SourceFileName=”powershell.exe” SourceFileLength=”452608″ />
<FileHash Type=”SHA256″ Data=”0x30E126A34BB6E9D83642D47C4B21D9154A9CE063C5BD2E8EBD1747B42D3731CE” SourceFileName=”powershell_ise.exe” SourceFileLength=”212992″ />
</FileHashCondition>
</Conditions>
</FileHashRule>
</RuleCollection>
Step 3 – Apply the Device Profile in Microsoft Endpoint Manager
Create a new device configuration profile for Windows 10 devices and apply it only to the new security group you created above. For the profile type select “Custom” and then use the OMA-URI value of:
./Vendor/MSFT/AppLocker/ApplicationLaunchRestrictions/9000/EXE/Policy
where the string value of “9000” is some value that you decide upon that makes sense to you. The other values must be entered exactly and this string is case sensitive. I use policy strings with 9’s in them when they contain restrictions, use what makes sense to you. Peter did a better job of describing the process in his excellent article.
You will then want to visit the test computer that you assigned to the security group and select “Synch” in the Company Portal App. Test out the policy by typing “PowerShell” at the start menu. If all is working correctly you will see the following message:

Conclusion:
You have now successfully configurated an Applocker restriction policy for Windows 10 devices and applied it using the Microsoft Endpoint Manager. This will make things harder for hackers to mess with your Windows 10 devices.
Frequently Asked Questions:
Quite simply, PowerShell is how malware moves through a local area network from computer to computer, and is also a way that malware runs programs to wreck computers.
This is outside the scope of this article, but the steps are very similar. You may wish to reach out to a Microsoft partner who could adapt our instructions for that instance.
Yes, that is indeed the case for certain companies using perhaps things like ManageEngine (a most excellent tool by the way!) or programs that perhaps run PowerShell scripts during installation or upgrade. My advice for this would be to go ahead and disable PowerShell for all users except for perhaps power users such as developers and IT staff. Then if an issue arises regarding programs not working correctly they can raise an internal support ticket and you can handle it that way. Our company has disabled PowerShell for a full year as of this writing (June, 2021) with no issue at all from regular users. We have established a security group for those users needing it and we then just excluded them from the config profile in Azure AD.
That is an excellent idea, and this could perhaps even lock down computers for an even higher level of security. I would suggest doing much testing with a group of users first though. I have found that when I remote into a user’s computer that it is very handy to have access to the Windows command shell however, so I would then have to log out that user and log in as myself as administrator in order to debug the user’s issue. This could create some support issues for helping your desktop users.
Obviously, no, disabling PowerShell would not satisfy that requirement. However, if the malware cannot run the .ps scripts encoded inside of it to encrypt your computer, or enumerate local computers and spread to other computers because it requires PowerShell to do it, then it does go a long way towards protecting corporate interests when backup system images are stored on a local drive hot-connected to each user’s computer. The idea of an air-gapped storage is to have an air gap switch on the USB device, or have the backup device turned off. But this requires a level of user interaction when running system images. It is better to script and run the system images (via something like Macrium or Acronis) and have these saved in an air-gapped storage device under the control of the system administrator. Then these images could either be run at the exact time when the storage was going to be hot (live connected).
Unfortunately, if you want to use this neat backup utility you must keep PowerShell enabled. You can easily see this by just disabling PowerShell on one computer (you can just edit the group policy for that single machine) and then attempt to install the Azure Cloud Backup sensor program. Installation will fail at the first instant you launch it because one of the prerequisites is to have PowerShell in place.
Code Blocks:
C:\Windows\System32\WindowsPowerShell\v1.0\powershell.exe
C:\Windows\System32\WindowsPowerShell\v1.0\powershell_ise.exe
C:\Windows\SysWOW64\WindowsPowerShell\v1.0\powershell.exe
C:\Windows\SysWOW64\WindowsPowerShell\v1.0\powershell_ise.exe <RuleCollection Type="Exe" EnforcementMode="Enabled">
<FilePathRule Id="921cc481-6e17-4653-8f75-050b80acca20" Name="(Default Rule) All files located in the Program Files folder" Description="Allows members of the Everyone group to run applications that are located in the Program Files folder." UserOrGroupSid="S-1-1-0" Action="Allow">
<Conditions>
<FilePathCondition Path="%PROGRAMFILES%\*" />
</Conditions>
</FilePathRule>
<FilePathRule Id="a61c8b2c-a319-4cd0-9690-d2177cad7b51" Name="(Default Rule) All files located in the Windows folder" Description="Allows members of the Everyone group to run applications that are located in the Windows folder." UserOrGroupSid="S-1-1-0" Action="Allow">
<Conditions>
<FilePathCondition Path="%WINDIR%\*" />
</Conditions>
</FilePathRule>
<FilePathRule Id="fd686d83-a829-4351-8ff4-27c7de5755d2" Name="(Default Rule) All files" Description="Allows members of the local Administrators group to run all applications." UserOrGroupSid="S-1-5-32-544" Action="Allow">
<Conditions>
<FilePathCondition Path="*" />
</Conditions>
</FilePathRule>
<FileHashRule Id="df42b48b-0bd5-444a-893a-98eb3bac349b" Name="Via Hash powershell.exe powershell_ise.exe" Description="Block via hash Via Hash powershell.exe powershell_ise.exe" UserOrGroupSid="S-1-1-0" Action="Deny">
<Conditions>
<FileHashCondition>
<FileHash Type="SHA256" Data="0xB6F3EF35A570861DEDD3ED9BFAD1910B537AE38C701B4AB19C5966A05E61689E" SourceFileName="powershell.exe" SourceFileLength="433152" />
<FileHash Type="SHA256" Data="0x45C77CCBCE87AD3A7B87755E83E8947C7FF08701C239076BCC0336198EB790C8" SourceFileName="powershell_ise.exe" SourceFileLength="213504" />
<FileHash Type="SHA256" Data="0xBAC613D793971F156BA846F8B1C1ABF6A635309EA32BD9258CD2AA1E1CD8C51E" SourceFileName="powershell.exe" SourceFileLength="452608" />
<FileHash Type="SHA256" Data="0x30E126A34BB6E9D83642D47C4B21D9154A9CE063C5BD2E8EBD1747B42D3731CE" SourceFileName="powershell_ise.exe" SourceFileLength="212992" />
<FileHash Type="SHA256" Data="C7D4E119149A7150B7101A4BD9FFFBF659FBA76D058F7BF6CC73C99FB36E8221" SourceFileName="powershell.exe" SourceFileLength="433152" />
<FileHash Type="SHA256" Data="DF54CBE8AD814AE09766F3CDB5C3BCA9BD407621211DAA23194E58533837D2E0" SourceFileName="powershell_ise.exe" SourceFileLength="213504" />
<FileHash Type="SHA256" Data="88E1993BEB7B2D9C3A9C3A026DC8D0170159AFD3E574825C23A34B917CA61122" SourceFileName="powershell.exe" SourceFileLength="452608" />
<FileHash Type="SHA256" Data="5BAF4A9DDDD940AA7BDD653342681ACD479FAE63A949296703D770BDEDD055B0" SourceFileName="powershell_ise.exe" SourceFileLength="212992" />
</FileHashCondition>
</Conditions>
</FileHashRule>
</RuleCollection>
As I am reading this it looks like you have nothing preventing a user from copying the powershell.exe file out of the folder and running it from another location. Please correct me if I am wrong.
Yes, that does appear to be the case, I’ll see if there is a way to block the whole command by not using hard coded paths and instead by using a REGEX. At least the first time the machine is infected the .PS programs won’t fire until they are savvy enough to dig around in the computer for the Powershell exe file and copy it to another path.
Hi James, I updated the post to reflect the use of the file hash blocking method. This will work but if the files are ever updated you will need to update the policy to reflect the new hash values. You could implement a policy which blocked by both file hash and file path for a way to have some level of blocking in place even if the files were updated.
Thanks so much for pointing this out.
The only way that I can see to protect this outside of using a hard coded file path (even with an Applocker path variable, see https://docs.microsoft.com/en-us/windows/security/threat-protection/windows-defender-application-control/applocker/understanding-the-path-rule-condition-in-applocker), is to use a hash rule instead of a path rule. This would then block any file with the file hash(s) listed in the rule. The obvious issue with this method is that whenever the two Powershell files were updated the file hash would change and the rule would have to be fixed. As far as I know I cannot use a REGEX in the file path rule in order to locate the Powershell executable if it were moved outside of the normal location.
Thanks so much for this very helpful information. I have implemented this in my company.